
Setting up your first deployment in Azure AI Foundry can feel like a maze—especially if you just want to spin up the latest GPT foundation model to use in your app or building an agent.
Let’s walkthrough how to spin up language models in Azure AI Foundry.
Azure AI Foundry is Microsoft’s newest platform for discovering, deploying, and managing AI models—whether you’re using OpenAI’s GPT-4, open-source options from Hugging Face, or other model providers like Mistral. It’s pro-code, built for developers, and designed to unify AI model lifecycle management with real governance and observability.
But the interface and workflow is… confusing. So I put together this walkthrough based on a fresh install—so you can get started without tripping over the setup.
What You’ll Learn in This Guide
- What Azure AI Foundry is and how it compares to Copilot Studio
- The difference between foundation models and embedding models
- How to choose the right model(s) for your use case
- How to deploy them in Azure AI Foundry
- How to get your API key and endpoint URL
- How to test your model inside the Foundry UI
Foundation Models vs Embedding Models: Which One Do You Need?
Before we jump in, a quick clarification.
For Retrieval-Augmented Generation (RAG) systems—or most real-world GenAI apps—you’ll need two types of models:
- Embedding Model: Converts your content (text, audio, etc) into vector format so it can be stored, searched, and matched semantically. Used for indexing documents or database records.
- Foundation Model: Generates responses. Think GPT-4 or Mistral. Used to summarize, chat, reason, or generate code.
Pro tip: Start small. Use lightweight embedding models (like text-embedding-ada-002) and only deploy GPT-4 when you’re sure you need it. Azure AI charges by token usage, so scaling smart matters when setting your token parameters.
Access note: You’ll need an Azure subscription and possibly approval for Azure OpenAI Service access if using proprietary models like GPT-5.
Step 1: Access Azure AI and Start a New Project
Let’s start from square one—spinning up your first Azure AI Foundry project. This step is all about getting logged in, creating a project, and getting to the dashboard where you can start deploying models. Whether you’re using a fresh Azure account or this is your first time in Foundry, I’ll walk you through every screen and explain the decisions you’ll make along the way.
Navigate to the Azure AI Foundry Portal
First, head to the Azure AI Foundry portal. Depending on how your tenant is configured, this might be:
- https://ai.azure.com
- Or accessed via the Azure AI Studio interface inside the main Azure Portal
You’ll need to log in using your Azure credentials. If you don’t have an Azure account yet, you can create a free one here.
First-Time Setup: Create Your First Project
If it’s your first time in Azure AI Foundry, you’ll likely be prompted right away to create a new project. Look for messaging like:
- “No projects found”
- “Get started by creating a project”
- “Welcome to Azure AI Foundry”
Click the “+ Create new” or “Create project” button to proceed.
If for some reason this screen doesn’t appear automatically, you can manually start a new project by clicking Create > Project from the top nav or sidebar.

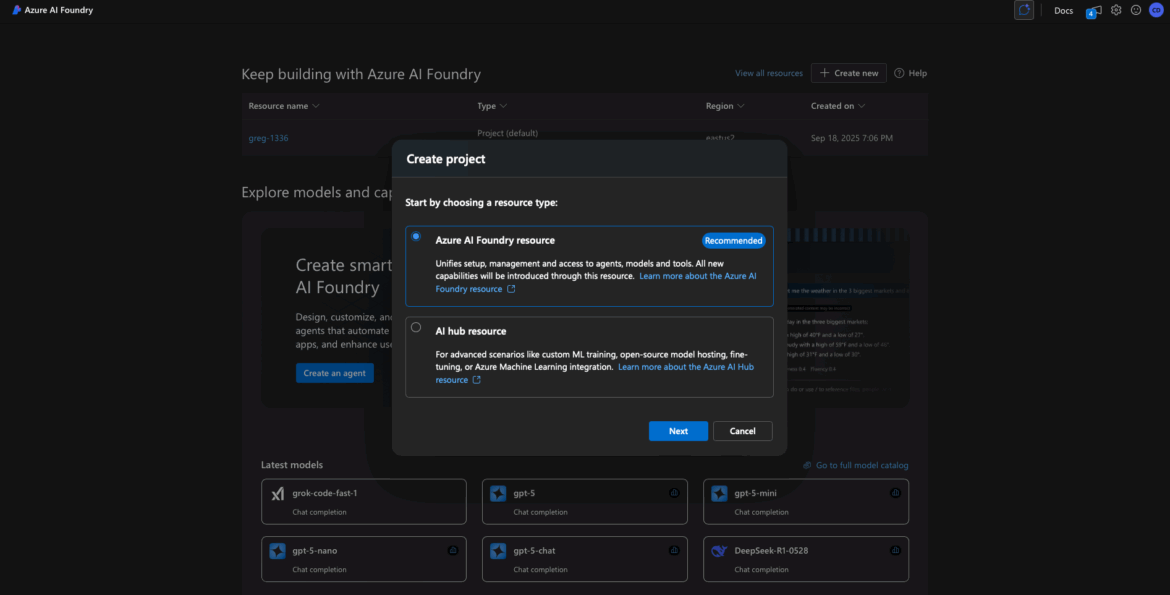
Choose the Project Type
At this point, Azure AI Foundry may offer two resource types:
- Azure AI Foundry Project
- Hub Resource
For most users (especially if you’re just experimenting or trying to deploy your first model), choose Azure AI Foundry Project. The Hub is useful later if you’re managing multiple projects or need shared configuration, security, or networking setups across a team. But it’s not required to get started.
📝 Tip: You can always associate a project with a Hub later if needed.
Fill in the Project Details
You’ll now see a form to configure your new project. Here’s what each field means and how to fill it out:
- Project Name: This is a friendly display name. Call it something simple like “My-First-AI-Project”.
- Subscription: Choose the Azure subscription to bill this project’s usage against. Most users will only see one subscription here.
- Resource Group: You can select an existing resource group or click “Create new” to make one. Example name: “AIFoundryResources”. This is just an organizational container for your project and its assets.
- Project Domain Name: This must be globally unique (across all of Azure). It’s used for internal identifiers and endpoints. Try something like “my-aifoundry-demo” or “my-ai-app-1234”. If the name is already taken, you’ll get an error and need to try another.
- Region: Pick a region closest to your app’s resources like your database to improve latency. If your database is in West US, spin up your models in West US. Common options include:
- West US
- East US
- West Europe
- Australia East
📝 Note: Not all model families are available in all regions. For example, if you want to deploy GPT-4 Turbo, stick with known regions like East US or West US.
You may also see advanced settings like “Associate with Hub” or “Networking options.” Leave these at their default values unless you know you need something specific.

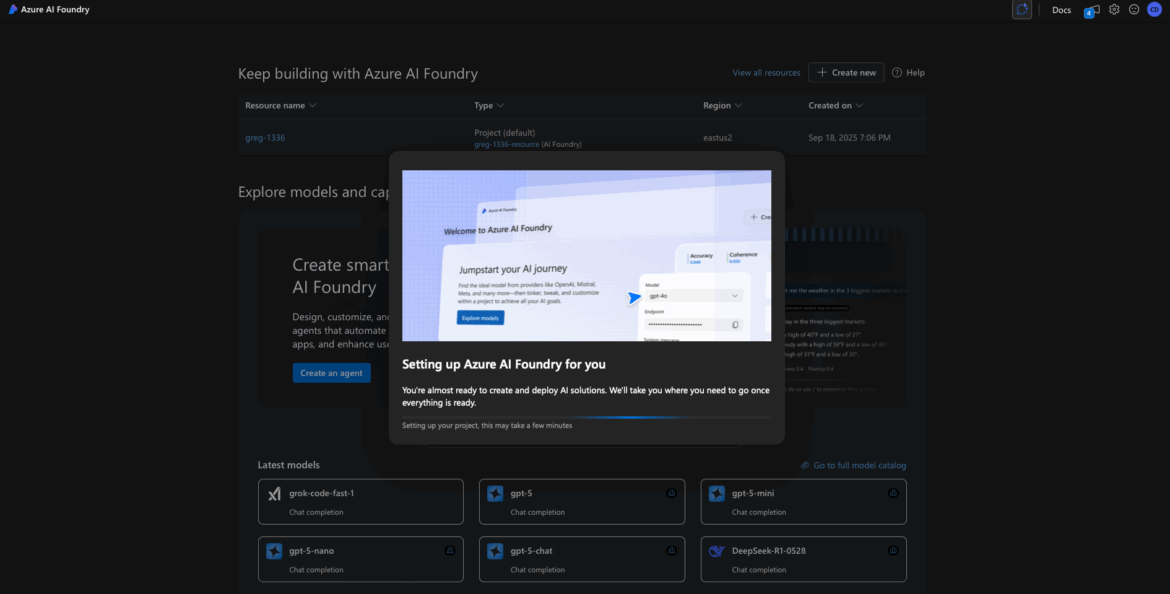
Create the Project
Once everything looks good, click Create or Review + Create > Create to start provisioning your project.
Behind the scenes, Azure will spin up the necessary infrastructure for you. This includes:
- Azure OpenAI resource
- Storage
- Key Vault
- Service connections
This can take anywhere from 30 seconds to 2 minutes.
Project Overview & Dashboard
Once provisioning is complete, you’ll land on your Project Overview page. This is your launchpad inside Foundry.
From here, you can:
- Deploy new models
- View keys and endpoints
- Track usage and billing
- Manage team access
Your dashboard may show:
- Project Name and ID
- Project Domain
- Empty model list
- Endpoint info for CLI or SDK usage

By the end of this step, you’ve successfully created your first Azure AI Foundry project. You’re now ready to deploy a model, generate API keys, and start building with real LLMs.
Step 2: Search the Model Catalog
Now that you’ve created your first Azure AI Foundry project, it’s time to put it to work. In this step, we’ll explore the Model Catalog to find the AI models you want to deploy—specifically:
- A Text Embedding model for converting text into vector representations (great for search, clustering, and retrieval tasks)
- A Chat Completion model like GPT-3.5 or GPT-4 for generating conversational responses
You’ll see how to search for these models, view their details, and prep them for deployment.
Open the Model Catalog
Once you’re inside your project workspace, look for “Model Catalog” in the sidebar navigation. This is where Foundry lists all the available models you can deploy into your project.
Click Model Catalog to open it.
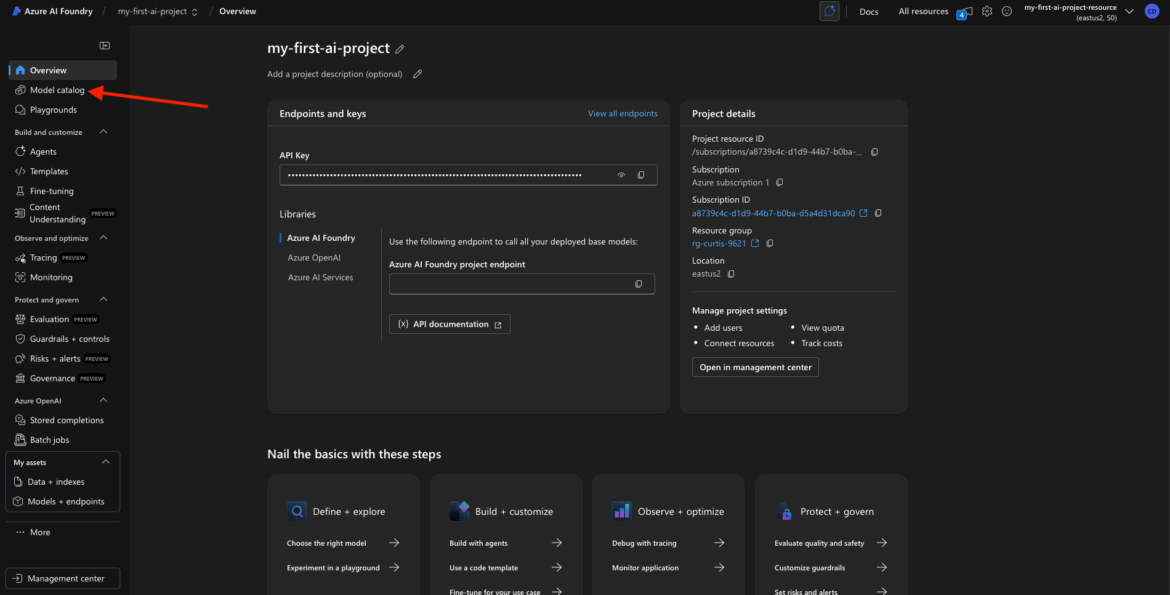
Depending on your screen layout, you may see this appear as a tab at the top or a section on the left.
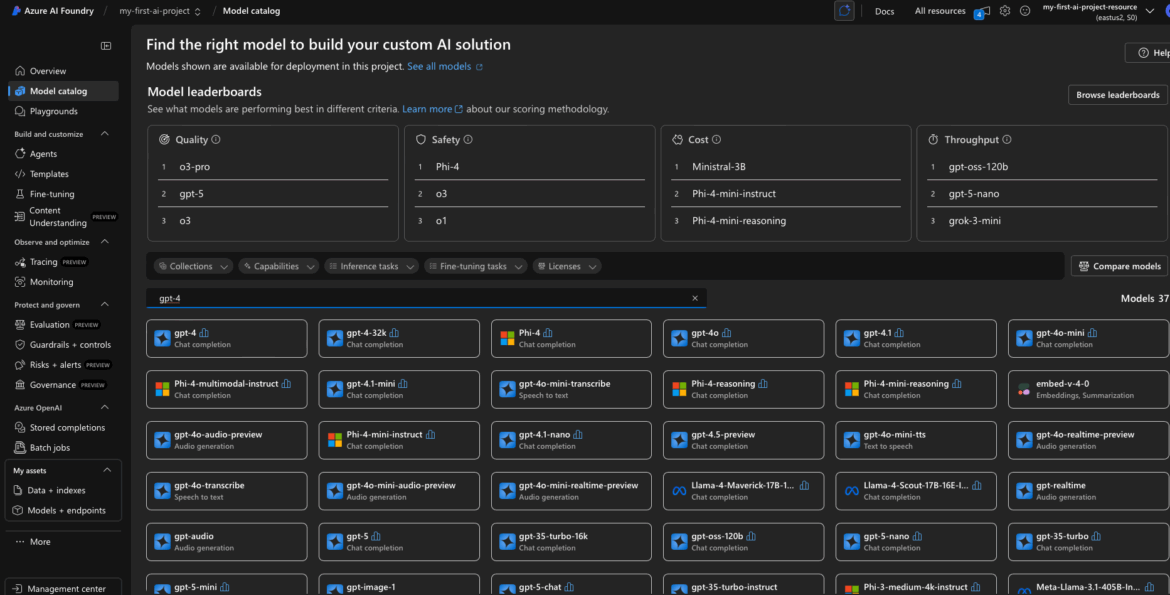
Browse or Search for Models
You’ll now see a searchable list or grid of foundation models provided by Azure. This catalog includes:
- Text generation models like GPT-3.5 and GPT-4
- Vision models (for images)
- Embedding models (used for turning text into vector data)
- Fine-tuned or task-specific models (depending on your region)
Let’s start with the Embedding Model.
Search for the Embedding Model
In the search bar at the top of the catalog, type:
embedding
You should see results like:
- text-embedding-3-small
- Possibly other versions like “text-embedding-ada-002” depending on the release cycle and naming
These models are typically based on OpenAI’s Ada family and offer a fast, efficient way to convert chunks of text into numerical vectors for downstream tasks.
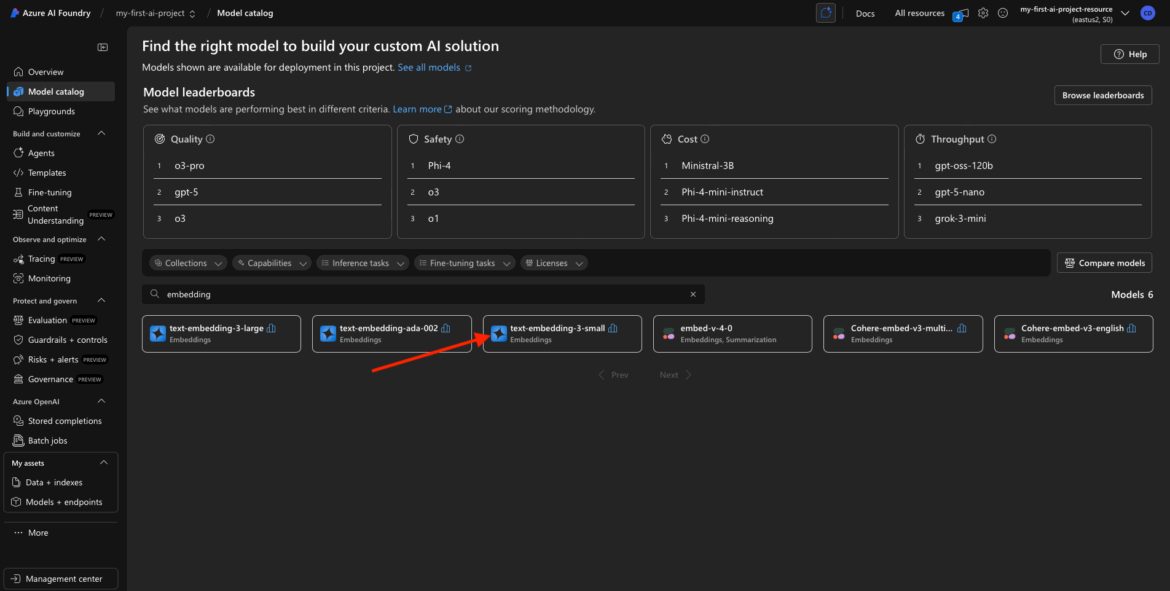
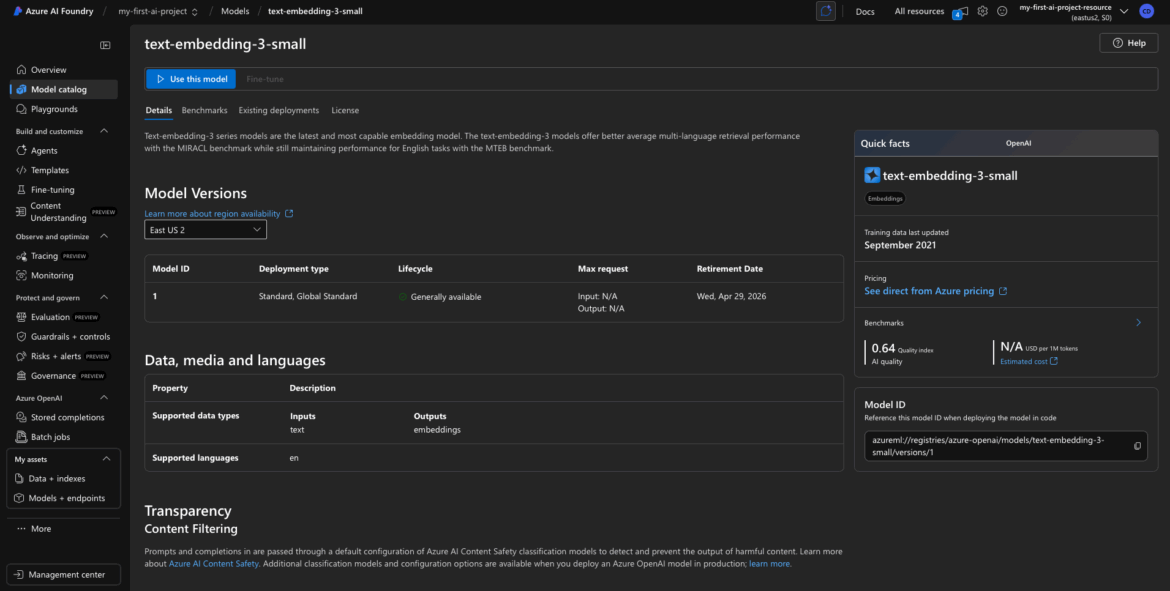
Click into the Model for Details
Click on the model name to open the details panel. This will show you:
- Model description and version
- Availability (regions where it can be deployed)
- Pricing per 1K tokens (useful for estimating costs)
- Model offer (typically “Azure AI Services,” which means fully managed)
- Possibly info about latency or SLA (optional)
This is where you decide whether this model fits your use case. For our purpose—vectorizing data for semantic search or clustering—this is a great fit.
Repeat for Chat Model (Optional)
Now let’s find the Chat Completion model.
In the search bar, type:
chat
Or search for a specific model like “gpt-3.5-turbo” or “gpt-4”.
Depending on your Azure region and account access, you might see options like:
- GPT-3.5 Turbo
- GPT-4 Turbo
- Possibly multilingual or tuned variants
Again, click into the model name to view:
- Description (often “chat-based large language model”)
- Pricing (per 1K tokens)
- Regions
- Offer type (e.g., Azure AI Services)
What You’re Seeing in the Catalog
Each entry in the catalog represents a model version that Azure is offering as a managed service. Key things to notice:
- The Offer will usually say “Azure AI Services” — this means you’re not responsible for hosting or maintaining the model.
- You’ll see a region list where the model is available. This matters: you can only deploy the model to your project if it’s in the same region as your project.
- Some models show token pricing, which is helpful for budget planning.
You don’t need to worry about infrastructure or scaling. These are API-based deployments—Azure handles the rest.
By the end of Step 2, you’ve:
Opened the Model Catalog
Found the Embedding model and Chat model
Reviewed their details
Confirmed they’re available for deployment in your region
Next up, we’ll deploy these models into your project and get your API keys and endpoint—so you can actually call them from your app or script.
Step 3: Deploy Your Embedding Model
You’ve got your project. You’ve found your model. Now let’s actually deploy it.
In Azure AI Foundry, deploying a model means you’re making it available for use in your project—whether you’re calling it via the portal, a notebook, or directly via API. In this step, we’ll walk through deploying the Text Embedding Ada model (or whichever embedding model you picked in Step 2).
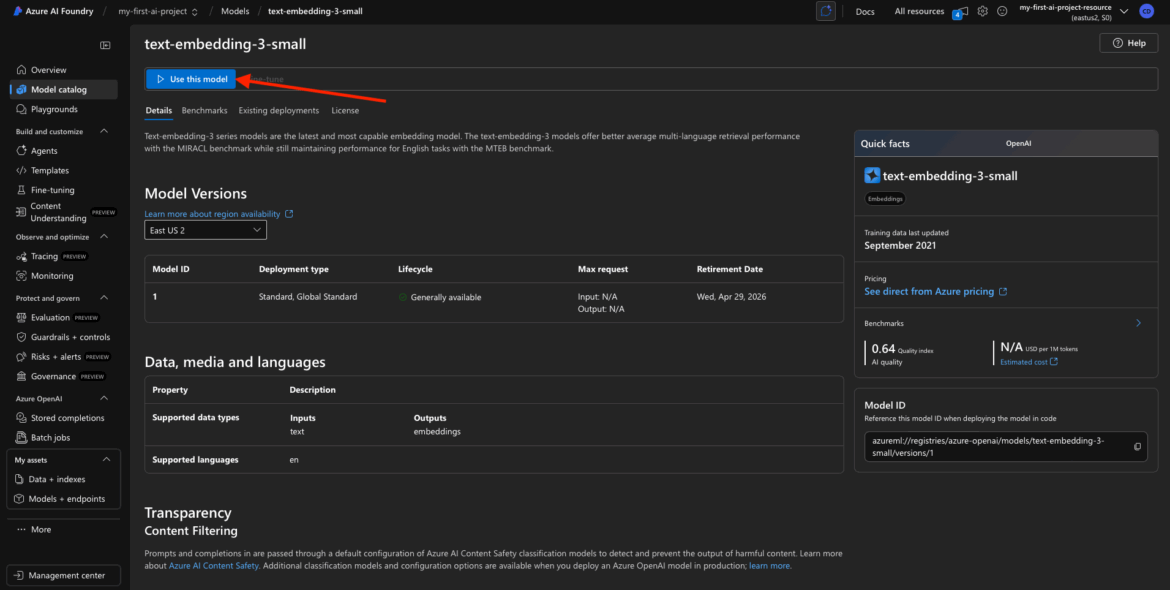
Use This Model
After you’ve clicked into the model details page, look for a “Use this model” button.
This kicks off the deployment process. You may also see a small rocket ship icon or a “Deploy” button—it depends slightly on the UI version you’re seeing, but the idea is the same: you’re creating a live deployment of that model inside your project.
Configure the Deployment
Now you’ll fill out a few required fields to finalize the deployment.
Deployment Name
This is a unique name you assign to your model deployment.
- Example: text-embed-model-1 or embedding-demo
- I used embed-model for mine.
- Use only lowercase letters, numbers, and hyphens—no spaces or special characters.
This name becomes part of the internal API identifier, so make it clear and consistent.
Tier / SKU Selection
Depending on your Azure account and the model, you may see options like:
- Standard
- Global Standard
- Provisioned (for high-throughput or SLA-guaranteed workloads)
For most projects, Standard is fine. I went with Standard in my walkthrough.
If you see Global Standard, just know it usually comes with higher throughput and a higher token quota, which might be helpful in production scenarios—but it’s not necessary for testing or light use.
Region / Location
This should match the region you selected when you created the project. If not, you may run into region to region latency issues later.
- I used East US 2
- Common options include East US, West Europe, or Southeast Asia
Azure should auto-fill the region for you if your project only supports one.
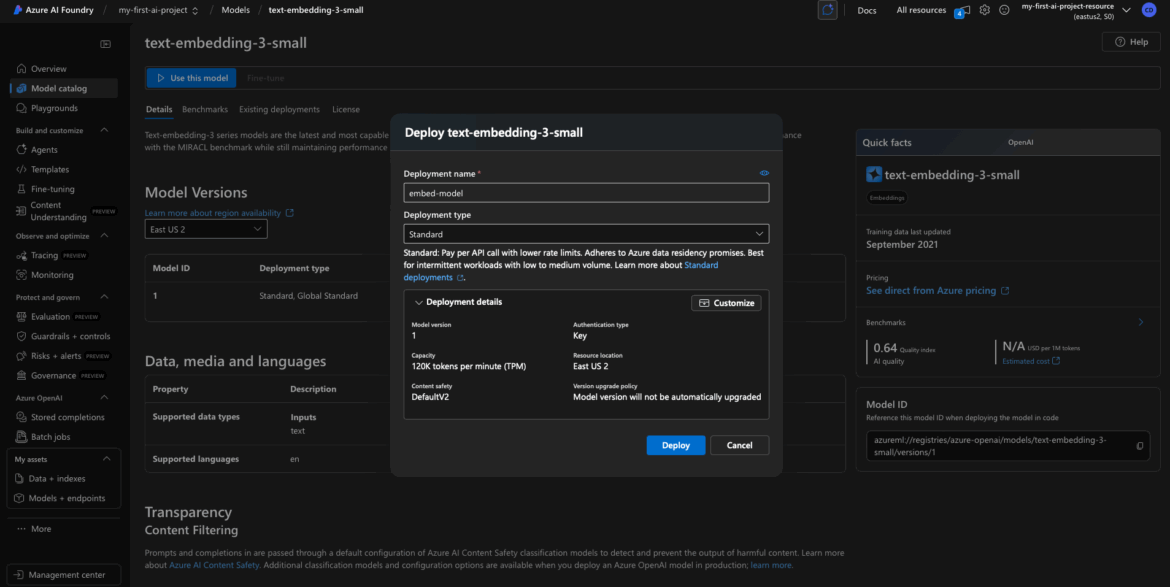
Click Deploy
Once your configuration is set, click Deploy.
Azure will now begin spinning up the backend infrastructure for your model deployment. This typically includes:
- Creating a deployment instance for the model
- Linking it to your Azure AI Foundry project
- Connecting with the underlying Azure OpenAI service (if applicable)
This part may take 30–60 seconds depending on your region and system load.
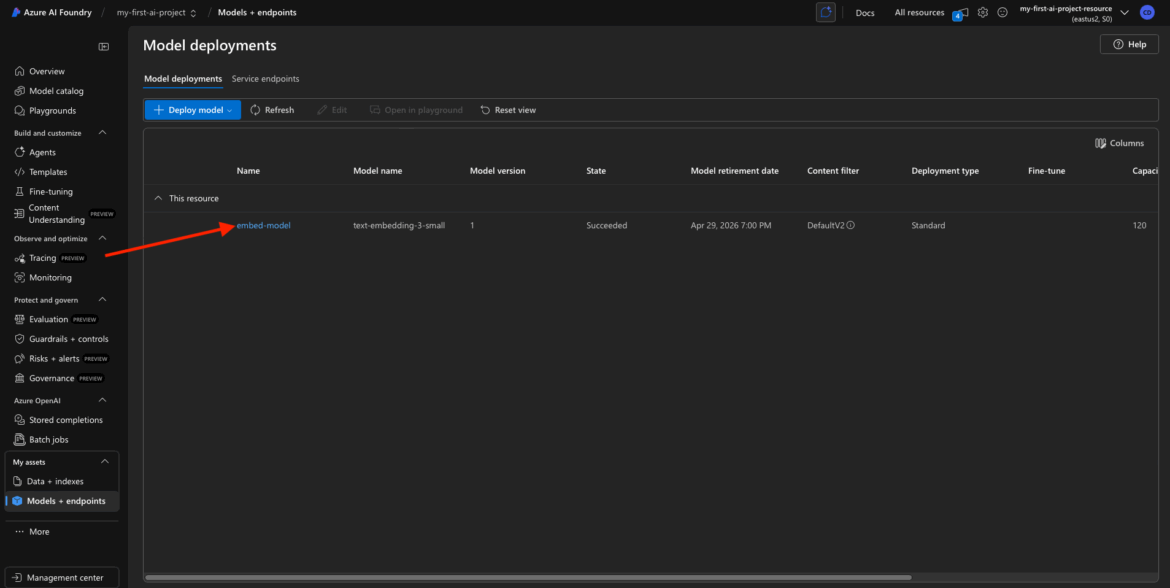
Deployment Success Confirmation
Once the deployment is complete, you should see one of two things:
- A confirmation toast or success message, and/or
- A list of active assets or My Assets showing your new deployed model
You can now see that your embedding model is live and available for use.
It’ll typically show:
- Deployment name (embed-model)
- Status: “Deployed” or “Succeeded”
- Type: Embedding
- Tier: Standard
- Region
✅ At this point, you’ve:
- Deployed your first model into Azure AI Foundry
- Set its name, tier, and region
- Watched Azure provision the backend resources for you
In the next step, we’ll deploy your foundation model.
Step 4: Deploy a model
Now that the embedding model is live in our workspace, let’s bring in the conversational heavy hitter—GPT-3.5.
This model will power your text generation workflows: think chatbots, natural language interfaces, summarization tools, and anything that needs a brain behind a paragraph.
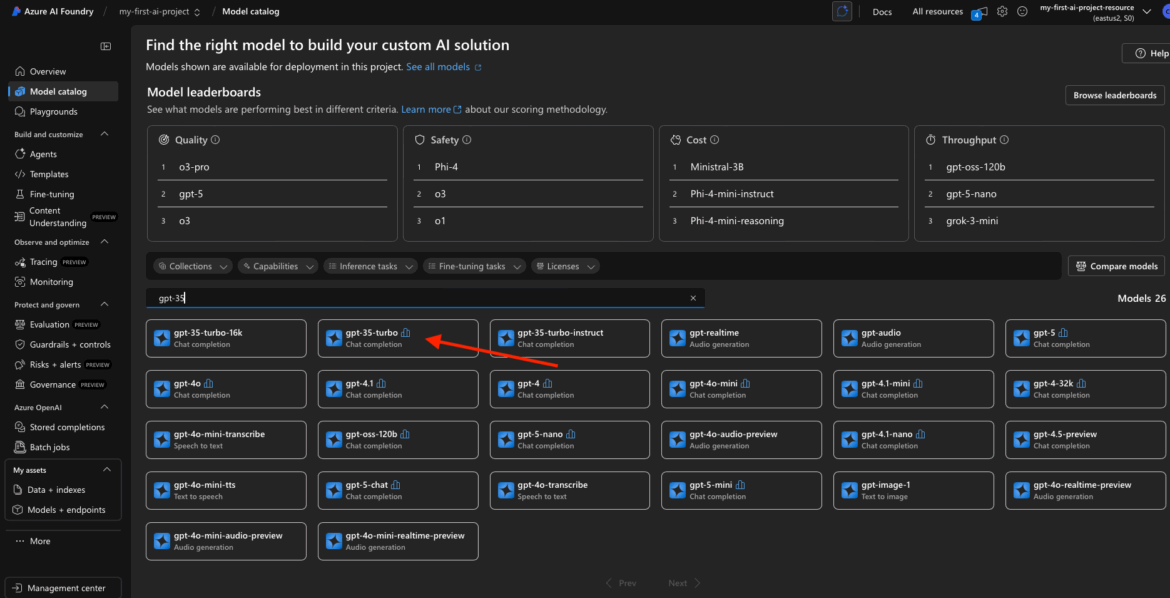
Find GPT-3.5 in the Model Catalog
Head back to the Model Catalog from your Foundry project dashboard.
You can either scroll through the Chat Completion section, or type “gpt-3.5” into the search bar. You’ll likely see a few variations depending on availability in your region and your Azure account:
- GPT-4 (standard version)
- GPT-4o (is a faster, more cost-effective, and multimodal version of GPT-4)
- GPT-3.5 Turbo (a solid fallback if GPT-4 isn’t available)
Click on the version you want. I used the base GPT-3.5 model for my project.
Use This Model
On the model’s detail page, click “Use this model.”
This opens the deployment wizard, just like we saw with the embedding model.
Configure the GPT-3.5 Deployment
Deployment Name
Give your model a name that reflects its purpose.
- Example: gpt35-chat-turbo or project-chatbot
- Keep it lowercase, hyphenated, no spaces or special characters.
I went with: gpt35-chat-turbo.
Tier / SKU Selection
Azure might give you a couple options here:
- Standard – Fine for light or dev usage
- Global Standard – Recommended if you expect higher throughput or heavier usage (e.g., production chatbots, long-form content, etc.)
GPT-3.5 is fairly mature, but models like GPT-4 can be compute-heavy. If you see Global Standard, consider using it if you plan to send a lot of requests. I used Standard for this example to keep things simple.
Model Version or Context Window
If you’re offered a choice between 8k or 32k context length:
- 8k tokens = faster and cheaper, fine for short conversations
- 32k tokens = useful for summarizing long documents or holding long multi-turn conversations
For most readers, I’d recommend starting with 8k.
Token Limit / Advanced Options
Sometimes you’ll see a field for Max Token Limit. This controls how long the model’s responses can be.
- You can leave this at the default (Azure handles this well).
- If you’re building something like a summarizer or doc Q&A tool, you might want to raise this later.
Region
Make sure the region matches your project—likely West US 3, East US, or wherever you deployed previously.

Click Deploy
Once you’ve filled everything in, hit Deploy.
This one might take a little longer than the embedding model—GPT-3.5 is a big model under the hood—but Azure handles all the provisioning for you behind the scenes.
If there’s any popup confirming resource creation or quotas, just acknowledge and proceed.
Deployment Success
Once the deployment completes, you’ll be taken back to your My Assets dashboard (or the project’s model list), and you should now see two models deployed:
- The embedding model from earlier
- The GPT-3.5 chat model we just created
They should both show a “Deployed” or “Succeeded” status.
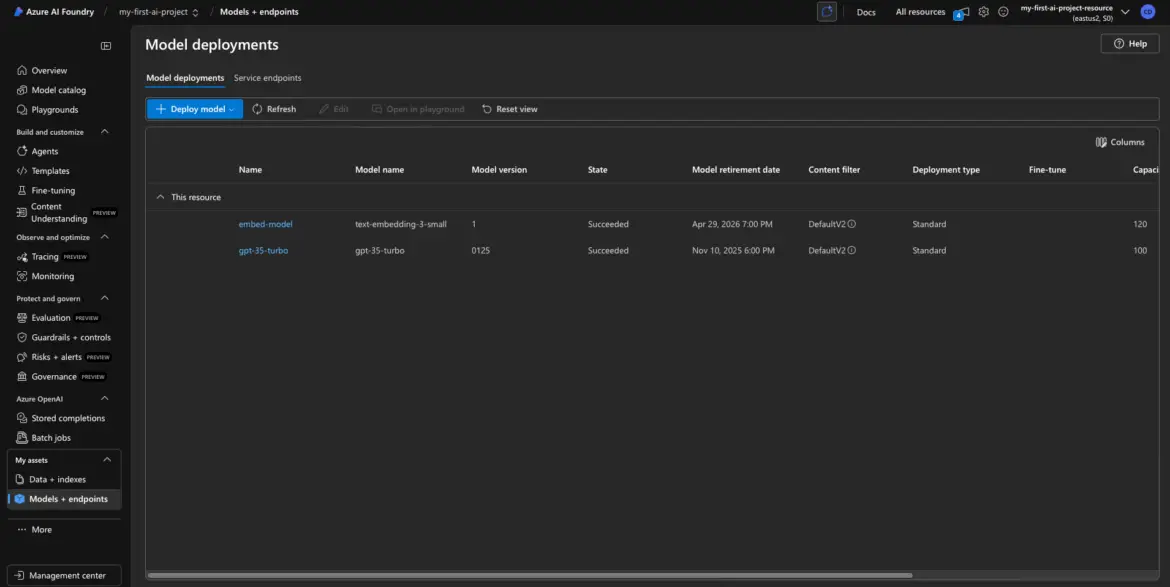
You’re now running two powerful models inside your Azure AI Foundry project:
- One to vectorize text
- One to generate language
In the next step, I’ll show you how to grab your model keys and endpoints, so you can actually use these deployments in your apps, scripts, or tools.
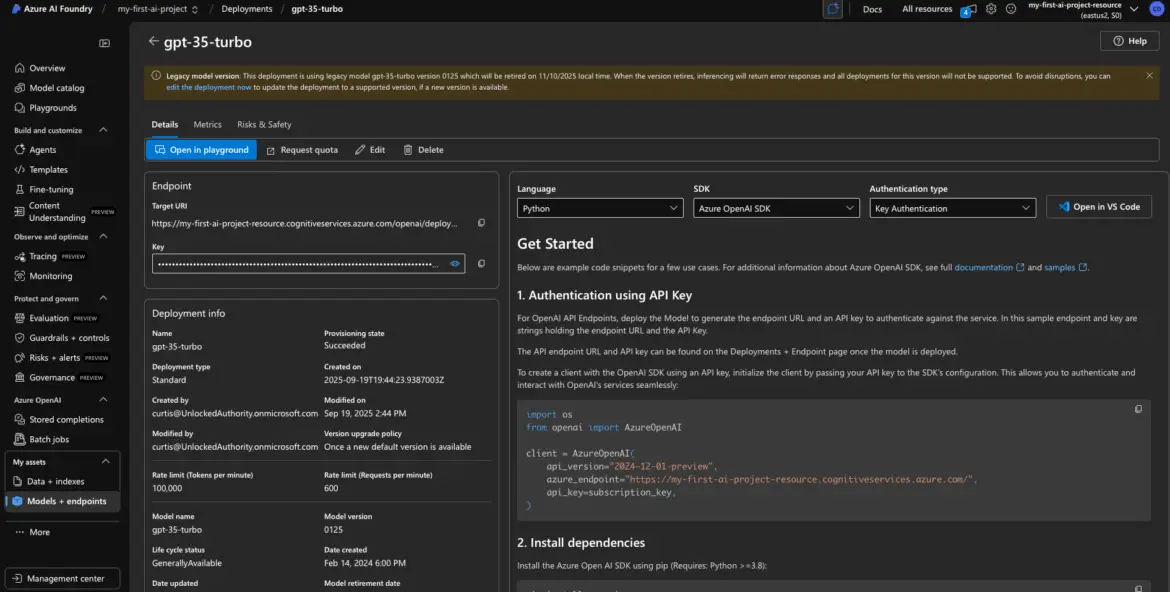
Step 5: Grab Your API Key and Endpoint
Step 5: Retrieve the API Key and Endpoint URL
You’ve deployed your models. Great.
Now comes the step where most developers start poking around the interface, wondering “Wait… how do I actually use this thing in code?”
Let’s get you the two critical pieces you need to bring your model into an application:
- The API Key (your credential to call the model)
- The Endpoint URL (where to send your request)
These are located in the Azure AI Foundry interface, tied to each model deployment.
Open the Deployed Model’s Details
Start with your embedding model.
From the My Assets page in your project, click on the deployed embedding model (e.g., embed-model). This brings up its detail page with all the juicy bits: key, endpoint, status, and more.

Find and Copy the API Key
Inside the model detail view, look for a field labeled something like:
- Key
- API Key
- Access Key
It might be hidden by default—look for a show/hide icon (like an eye icon) to reveal it. Click it, and copy the full key.
Important: This key is like a password. Do not share it publicly or hardcode it into version-controlled files. You’ll use it as a bearer token or API key in your requests.

Copy the Endpoint URL
Right next to the key, you should see a field labeled:
- Endpoint
- URL
- HTTP Endpoint
This is the full path where you’ll send your requests. It usually looks something like this:
- https://myproject.openai.azure.com/openai/deployments/text-embed-model-1/…
Copy this URL—this is the endpoint you’ll hit when using this model in code or via tools like Postman.
Optional: Break Down the Endpoint (for SDK use)
If you’re using Azure’s OpenAI-compatible SDKs, you might need to separate the values like so:
| Term | Value | Where to Find |
| Resource Name | myproject | This is the subdomain at the start of the URL from the Base Endpoint |
| Deployment Name | embed-model | This is the segment after /deployments/ |
| API Key | abc123…xyz987 | From the Key field |
| Base Endpoint | https://myproject.openai.azure.com/ | You’ll set this in environment variables or config files |
This breakdown helps when you’re setting up things like openai.api_base, openai.api_key, and deployment_name in Python or Node.js.
Repeat for GPT-3.5 Model
Next, go back to My Assets and click on the GPT-3.5 deployment (e.g., gpt35-chat-turbo).
You’ll see a very similar details panel.
- Copy the API Key again (it will likely be the same key as the embedding model).
- Copy the GPT-3.5-specific Endpoint URL, which will have the GPT model’s deployment name in it.
Note: If both models use the same Azure OpenAI resource, the key is shared. That’s perfectly normal. You can reuse the same key across all deployments in that project.
At This Point, You Should Have:
API Key — A long, secure string to authenticate with the Azure OpenAI service
Two Endpoints — One for your embedding model, one for your GPT model
Deployment Names — Used in SDKs or API calls to specify which model to invoke
You’re ready to write your first API call.
If you’re using Python, Node, Postman, or even a low-code tool like Langflow—this key + endpoint combo is what you plug in to bring your model to life.
Up next? I’ll walk you through a few examples of how to actually use these keys—either from code, Postman, or your favorite SDK.
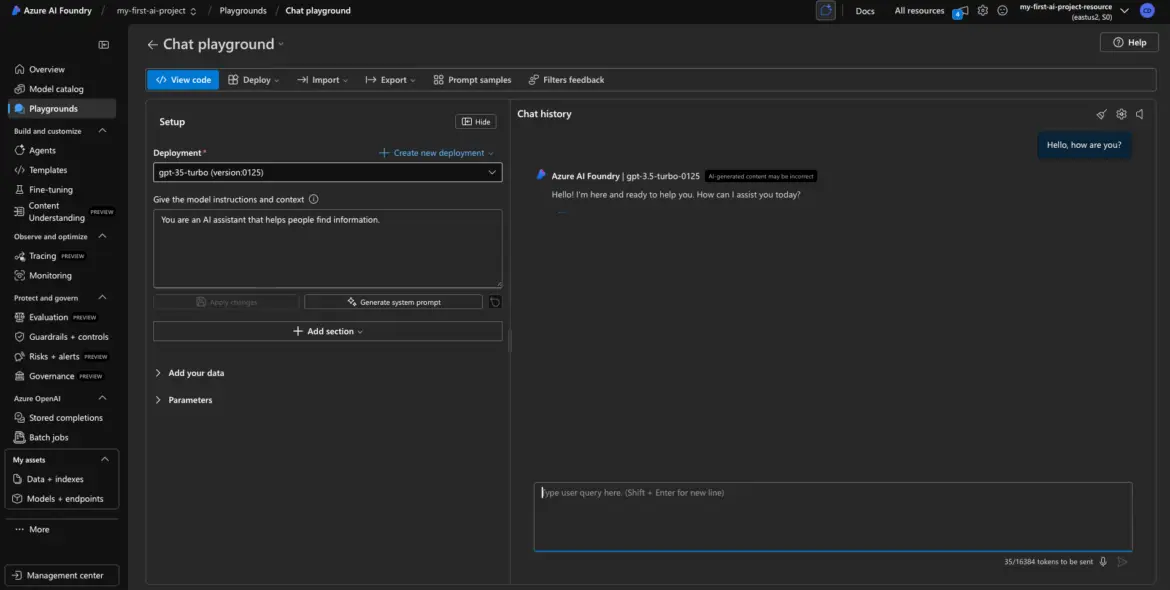
Step 6 (Optional): Test with Playground
Before you start wiring up SDKs, building UI flows, or embedding the model into your app, there’s one super helpful thing you can do:
Make sure it works.
Azure AI Foundry gives you a built-in testing tool called the Playground, and it’s worth using to validate that your model deployment is actually responding—no code required.
Test GPT-3.5 in the Playground
Let’s start with your GPT-3.5 deployment.
From the model’s detail view, look for a button labeled “Open in Playground” or a tab in the top navigation.
Click that.
You’ll enter a chat-style interface where you can talk to your GPT model directly. It’s very similar to OpenAI’s own playground.
Example Test Prompt
In the right-hand input box (the “prompt” window), type something like:
Hello, how are you?
Then hit Submit or Run (depending on the interface).
If everything is deployed correctly, you’ll get a friendly response back like:
“I’m doing great, thanks for asking! How can I assist you today?”
Congrats—you just made your first call to GPT-3.5 using your deployed model.
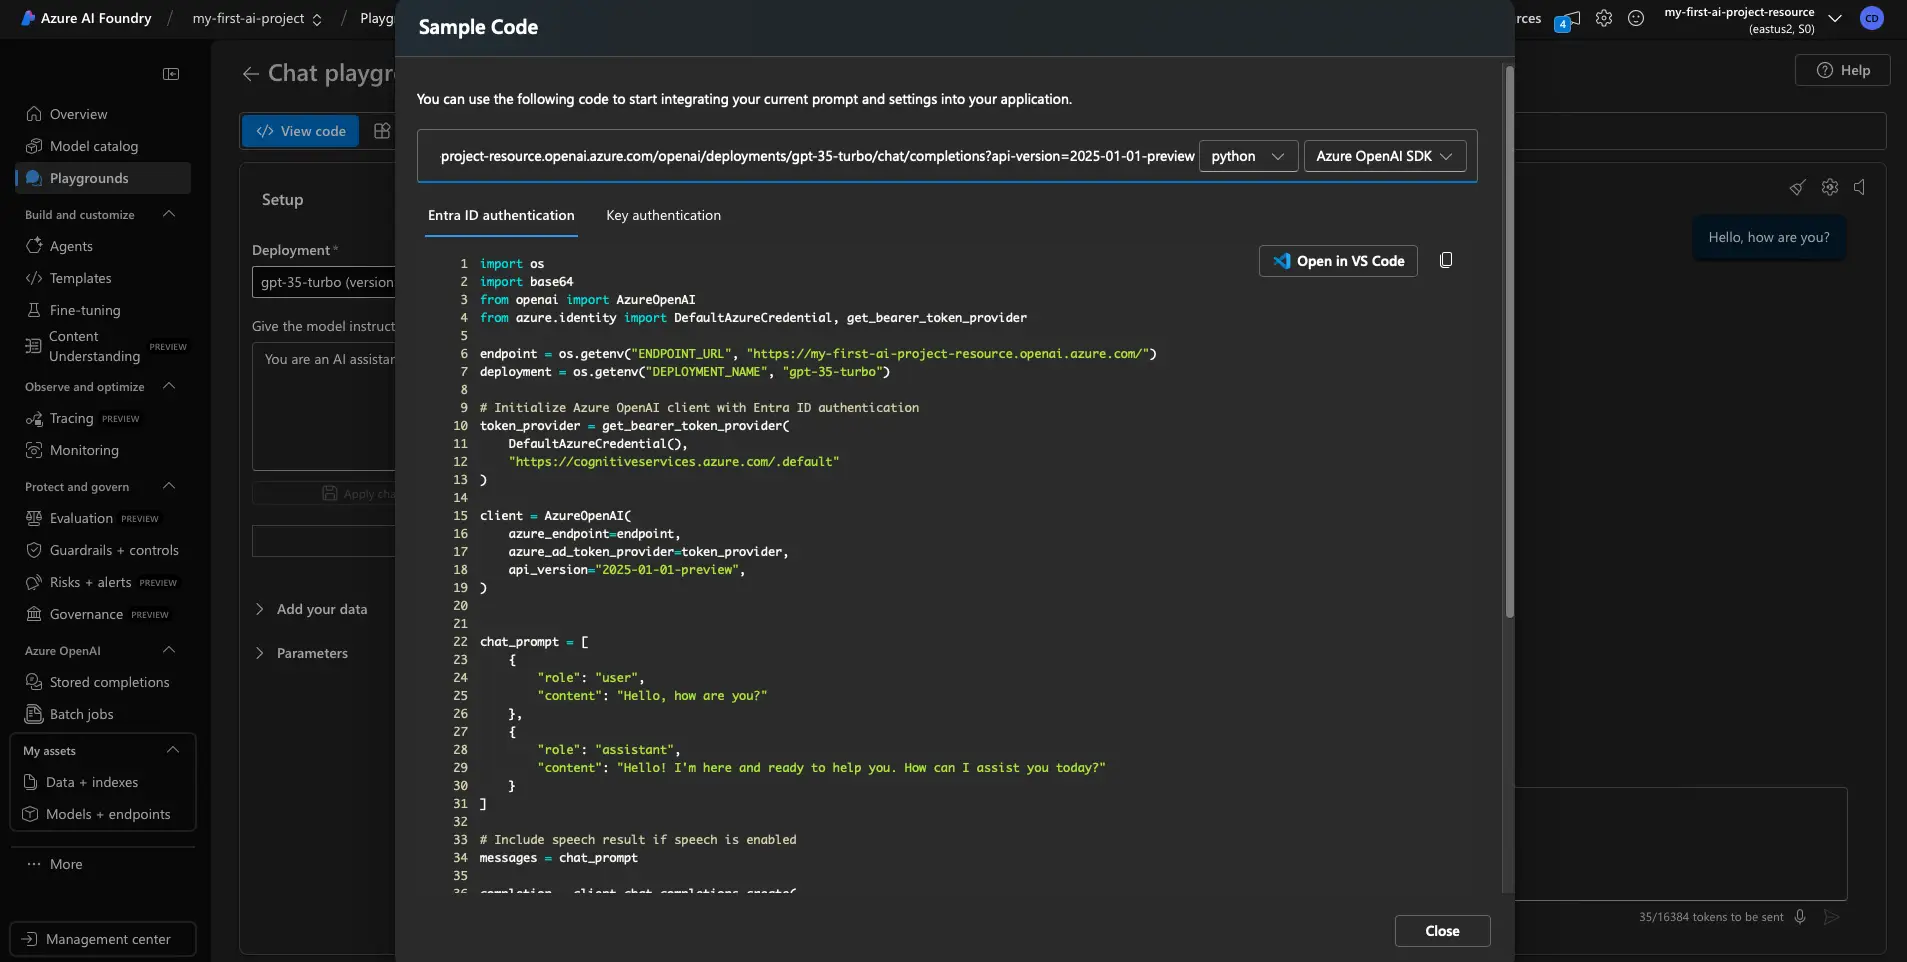
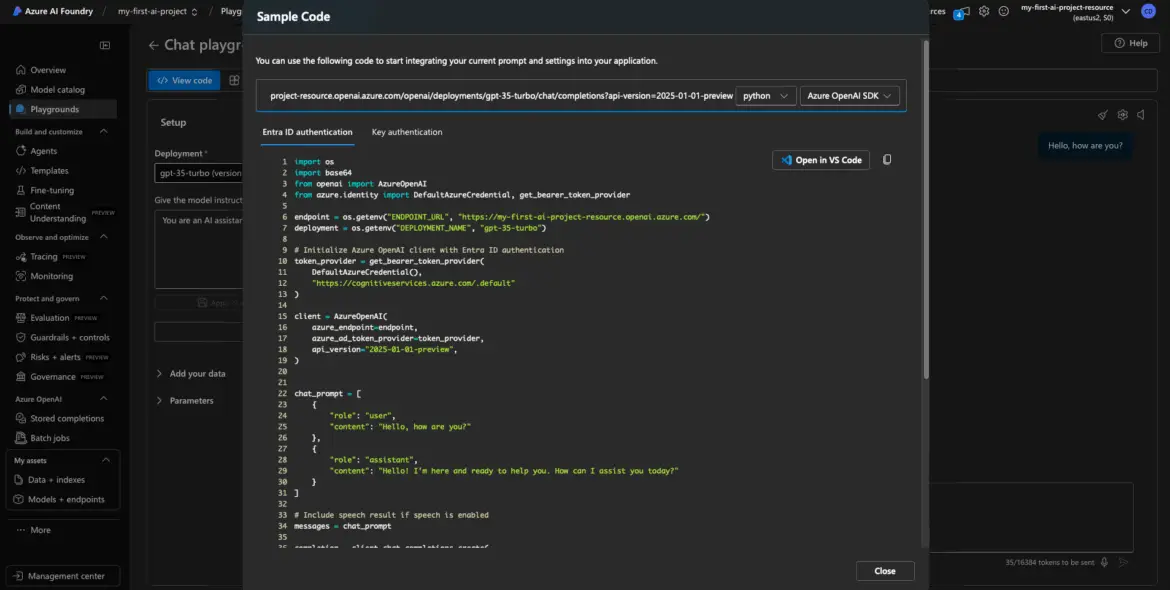
Grab a Code Snippet While You’re There
This is one of the best features of the Playground: you can copy real code to use in your app.
Look for a “View Code” or “Get Code” button. It usually offers snippets in:
- Python (using the openai SDK)
- Curl (for quick CLI or Postman tests)
- Sometimes even JavaScript

These snippets will include:
- Your endpoint
- Your deployment name
- A request template
- A placeholder for your API key
This is gold for developers—copy the snippet into your codebase or testing tool and modify as needed.
What About the Embedding Model?
Testing embedding models is a bit trickier in the Playground.
You might be able to type in some sample text and hit Run, but instead of a sentence or paragraph in return, you’ll get back something like:
[0.1231, -0.4556, 0.9823, …]
That’s a vector—the numerical representation of your input.
It’s not something you “read” like a chat completion, but it’s exactly what you want when using embeddings for tasks like search, classification, clustering, or semantic analysis.
Because of that, most people skip Playground testing for embedding models and just test them through API calls in code.
Still, it’s good to know the model is deployed and functional.
Why Bother Testing?
Here’s what a quick test in the Playground gives you:
- You confirm your API Key and Endpoint are working
- You know your deployment name is being recognized
- You eliminate common errors like bad region, invalid key, or wrong deployment reference
If something doesn’t work—like you get a 401 or 404—you can troubleshoot before you write a single line of code.
Wrap-Up and Next Steps
Congrats—you’ve:
Created a project in Azure AI Foundry
Deployed an embedding model and a GPT model
Retrieved your endpoint and API key
Verified the models work via Playground
Now you’re ready to plug these into your RAG pipeline, chatbot, or production app.
A Few Best Practices:
- Keep your key secure (rotate regularly)
- Watch token usage and cost in Azure billing
- Delete unused models to avoid charges
- Start small and scale as needed
Was this walkthrough helpful?
Drop me a note—I would love to hear what project you are building with your newly minted keys!
